There are numerous Wordpress plugins for creating image sliders/galleries out there, but this isn’t yet another how-to for using any of those. Instead, we want to show you the power and versatility of a plugin called Simple Fields.
Imagine that you want to customize the look of one or more pages with an image slider. There are a thousand and one ways of doing this, but let’s narrow it down by saying that the editor wants to be able to create his/her own image slideshows and choose which set of images is to be displayed as a slideshow on which page. That still leaves us with quite a few ways of going about it; like plenty lines of code in your page template and/or the functions.php of your theme, or installing one of all the image slider/gallery plugins on Wordpress.org.
Reinventing the wheel is perhaps useful for the beginner who wants to learn the inner workings of Wordpress, everyone else usually goes for the first and best plugin that does the trick. However, with experience comes the understanding of avoiding the use of too many plugins. This is why we like Simple Fields. By utilizing the versatility of this plugin, we find ourselves in much less need of plugins for basic tasks like this.
First off, let’s set up a custom post type for our slideshows. Add the following to the functions.php of your theme:
register_post_type('slideshows', array(
    'label' => 'Slideshows',
    'show_ui' => true,
    'supports' => array('title'),
    'labels' => array (
        'name' => 'Slideshows',
        'singular_name' => 'Slideshow',
        'menu_name' => 'Slideshows'
    ),
) );
This creates a very basic custom post type which at this points has no content or attributes to edit besides the title. This because we intend to add and manage the content with our own custom fields instead of the standard content editor in wordpress. Although this can be done using the Simple Fields administration pages as described in the Simple Fields documentation, we’re going to show you how to do this in code.
What we want is a repeatable file upload field attached to our slideshow posts so that we can freely add as many images we like to the slideshow. To do this, we begin with registering a field group like this (still in the functions.php of your theme):
simple_fields_register_field_group('slideshow_images',
    array (
        'name' => 'Slideshow images',
        'description' => 'Add images to your slideshow here',
        'repeatable' => 1,
        'fields' => array(
            array('name' => 'Slideshow image',
                'slug' => 'slideshow_image',
                'description' => 'Select image',
                'type' => 'file'
            )
        )
    )
);
The next step is to connect the field group to our slideshows post type. Again add to the functions.php file of your theme:
simple_fields_register_post_connector('slideshow_images_connector',
    array (
        'name' => "Slideshow images connector",
        'field_groups' => array(
            array('name' => 'Slideshow images',
                'key' => 'slideshow_images',
                'context' => 'normal',
                'priority' => 'high')
        ),
        'post_types' => array('slideshows'),
        'hide_editor' => 1
    )
);
The image field group is now associated with our slideshows post type, but there is one more thing we need to do in order to make the fields visible by default:
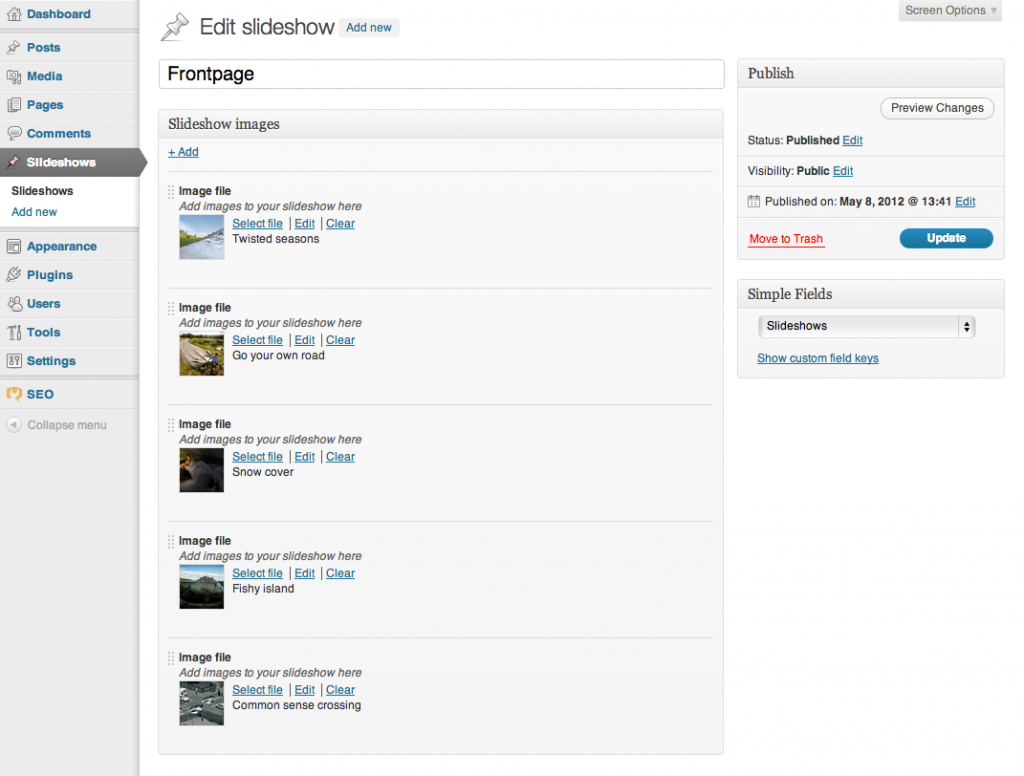
simple_fields_register_post_type_default('slideshow_images_connector', 'slideshows');At this point, you should be able to go to your WordPress administrator pages, select edit or add a new slideshow and then see the repeatable file upload field that we just created. It should look something like this:
As you can see, we have all we need to create and manage slideshows as we see fit. Neat, huh?
However, it’s not time to lean back and enjoy just yet. We also need the ability to select which pages that should display which slideshow and then actually display the slideshows, right? No worries, Simple Fields gives us the tools to ease this part as well. How about adding a simple slideshow selector on the edit page? Start editing your functions.php file again and add the following:
simple_fields_register_field_group('slideshow_page_options',
    array (
        'name' => 'Slideshow options',
        'fields' => array(
            array('name' => 'Slideshow display',
                'slug' => 'slideshow_page_display',
                'description' => 'Choose a slideshow to display on this page',
                'type' => 'post',
                'type_post_options' => array("enabled_post_types" => array("slideshows"))
            )
        )
    )
);

simple_fields_register_post_connector('slideshow_page_connector',
    array (
        'name' => "Slideshow page connector",
        'field_groups' => array(
            array('name' => 'Slideshow options',
                'key' => 'slideshow_page_options',
                'context' => 'normal',
                'priority' => 'high')
        ),
        'post_types' => array('page')
    )
);

simple_fields_register_post_type_default('slideshow_page_connector', 'page');
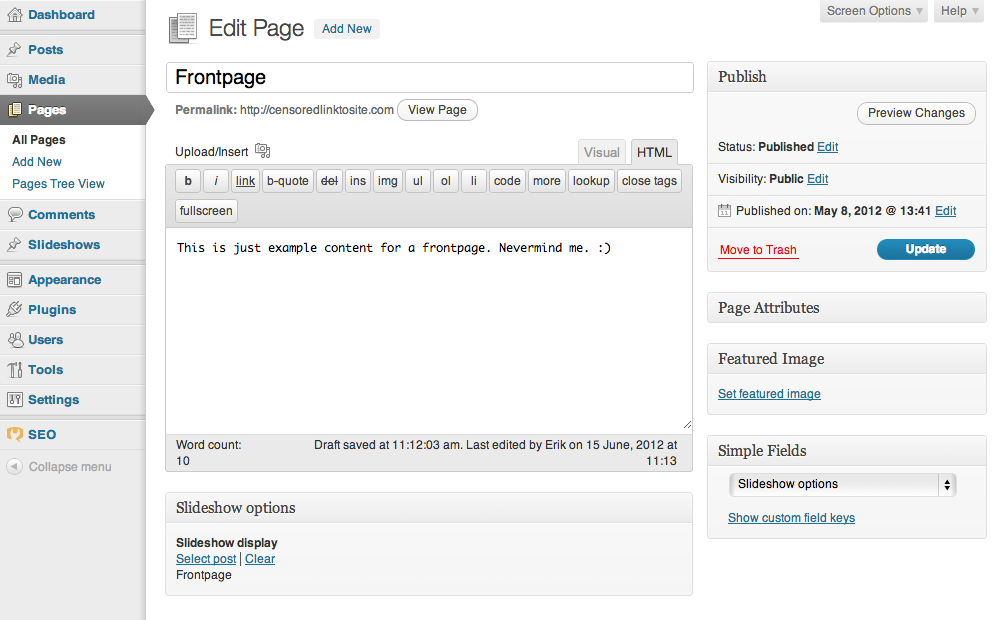
The above adds an extra field on your standard page editor pages where you can select a slideshow to associate with the page. Like this:
Now all that remains is retrieving the slideshow images in your page template and display them. You can of course use whatever markup you like to suit whichever way you want your images to display, but let me give you an example of code for your page template using the Flexslider jQuery plugin. For template tidiness, start with adding this to your functions.php:
function page_has_slider($theID) {
    $slider_id = simple_fields_get_post_value($theID, "Slideshow display", true);
    return ($slider_id) ? $slider_id : false;
}

function get_slider_images($slider) {
    if (empty($slider)) {
        return false;
    } else {
        if (is_numeric($slider)) {
            $post_key = "p";
        } else {
            $post_key = "post_name";
        }
        $slides = array();
        $slide_query = new WP_Query(array( "post_type" => "slideshows", $post_key => $slider));
        if ($slide_query->have_posts()) : while ( $slide_query->have_posts() ) : $slide_query->the_post();
            $img_attachments = simple_fields_get_post_group_values(get_the_ID(), "Slideshow images", true, 2);
            foreach($img_attachments as $image) {
                $slides[] = wp_get_attachment_image( $image["Slideshow image"], "slider-image");
            }
        endwhile; endif; wp_reset_query();
        return (!empty($slides)) ? $slides : false;
    }
}
One function to check if the page has a slideshow associated with it, another to retrieve the images of the slideshow. That’s all we need. Now take a look at how little code we need in the page template to display the images of the slideshow. Just put the following inside ”The Loop”:
<?php if ($slider = page_has_slider(get_the_ID())) { ?>
    <div class="flexslider">
        <ul class="slides">
        <?php
            $slides = get_slider_images($slider);
            foreach ($slides as $slide) {
                echo "<li>" . $slide . "</li>";
            } ?>
        </ul>
    </div>
<?php } ?>
Now is the time to lean back and enjoy! 🙂
For those who endured this far, we thank you for your time and hope you liked this little tutorial. We aim to write more so don’t forget to check us out once in a while. And as always, feedback is really appreciated so don’t hesitate to let us know what you think in the comments section below. Happy coding!

